
A Practical Guide for Multi-Media oOo in a Small or Medium size Parish oOo
| Operations | Home | … |
Multi-Media Technical Operations
During Service
The key focus during service is to enhance worship experience and record quality audio and video at source.
Editing can at best enhance recorded media (audio or video) but “cannot” regenerate lost or bad recording.
The key is to test, test and test during pre-service.
Visual Presentation
Visual Overview:
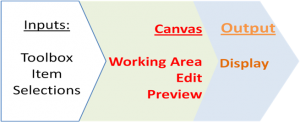
Almost all visual projection software works on the principle of input, workbench and display area analogous to a carpentry or painting artist.
Projection Software:
A wide range of visual projection software exists ranging from basic to advance. The concept remains same as above.
- Microsoft Powerpoint or OpenOffice Impress
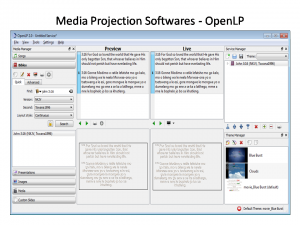
- *Our First love – www.openlp.org (currently being actively developed) Multi-platform
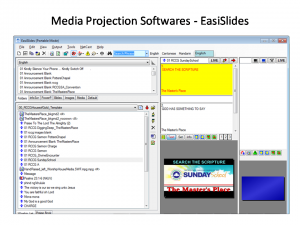
- Our current defacto – www.easyslides.com (unfortunately seems development stalled)
- DreamBeam – www.dreambeam.de/
- Ultimate – Presentation Manager (Mac)
- http://e7impress.sourceforge.net/
- Compilation – www.urbanministry.org/christian-freeware
*NB : One of the key deciding factor going with EasySlides is because it is portable and has varied Bible translation support. However, it seems development has stalled with the source code not release for others to assist. Thus, we are re-evaluating possibility of moving (porting) back to Openlp which is completely open source and has South Africa developers active in development team. More so, a portable version has been released.
Screens:
When setting up and projecting, due consideration must be given to type of screen and technique of projecting.
Front Screen comes in Tripod or ceiling mounted. (This is the most common)
Rear View Screen: Allows the Projector to be placed behind the screen away from general public view. Generally more expensive
Truss Mounted Screen: Typically made of Aluminium. Easy to set up and fold away
Soft Edge: With the use of switchers (such as Eventix Computer switcher), it is possible to superimpose two different projection unto a wide (panoramic) screen which will give an image over the whole screen. Soft edge blending is a new dynamic way which transforms the way media is presented in churches as seen in Jesus House, London, UK and Strong Tower Manchester, UK
Plasma: Where daylight intensity is high, the use of conventional projectors might not be workable as the display image might faint out. In this situation, Plasma (or LED/LCD screen in small areas) should be used. Plasma are stackable and can span 16x9m or more. Outdoor plasma screens are in use at the RCCG Redemption Camp, Lagos, Nigeria.
Visual Projection:
Set up Project screen (if tripod, position without obstructing alter, if mounted pull down, pull down manually or electrically)
Set up Project (if not mounted, position and align with screen, if mounted, use remote to switch on, if remote unavailable (or lost), use long pole to switch on)
Power on Projector,
Connect projector visual cable (typically VGA cable) to computer (laptop or Desktop)
Choose a Desktop background that reflect the Parish theme rather than standard computer’s background or personal background
Setup computer for second dual screen; NB do not duplicate screen rather extend)
Adjust projector accordingly (if need be)
Projection steps:
Get the theme/topic of the service prior
Ensure second monitor (projector) is set (configure) from Desktop, properties, Settings, “Extend my windows desktop onto this monitor”
Launch EasiSlides software (or OpenLP, or EasyWorship, or Presentation Manager)
Arrange order of service (service manager,
Pre-include templates sections: Hymns, welcoming, announcement, grace…
Determine and configure “default” setting/theme (text, image, background, and video) for the service
Test live output.
Connect Video input (for live video if required) through USB DVR or DV player
Sound recording:
Procedure for Lame HardDisk Ogg Software:
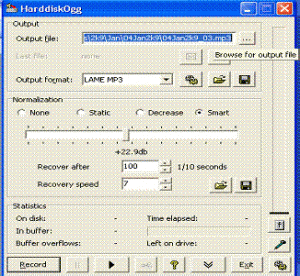
Create folder: ddmmmyyy (eg 29Jul2k7) or ddmmmyyyy (eg 29Jul2007)
Launch recording software (LAME Harddisk Ogg)
Select output file: foldername_01.mp3 (eg 29Jul2k7_01.mp3)
Carry out dummy record to ensure recording is ok and records into actual (intended) folder: Select record, record for 5sec, stop, and check mp3 output.
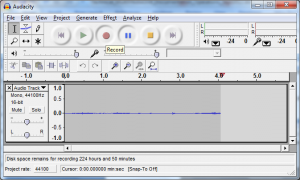
Procedure for Audacity Software:
 Create folder: ddmmmyyy (eg 29Jul2k7) or ddmmmyyyy (eg 29Jul2007)
Launch recording software (Audacity)
Click on File >> New (Ctrl + N)
Click on Record (red round button)
Click on Stop (Orange square button)
Export output file: foldername_01.mp3 (eg 29Jul2k7_01.mp3)
NB: Irrespective of what software (albeit sophisticated such as Adobe Audition, SonarLE, CuBase, Qtractor …), the fundamental procedure remain the same
Audio RecordingTypically recording commence at the start of Praise Worship.
NB: if requested of Pastor or ministering minister, multi-media might record other sections such as Sunday school (Search the Scripture), workers meeting …
Start recording (Lame HardDisk Ogg)
![]() Use cut (Scissors like icon in LAME) to create new mp3 files automatically and to ensure different sections are recorded separately: Praise Worship Intro, Praise, Worship, Call to Service, Ministration, Sermon, Alter call …
Use cut (Scissors like icon in LAME) to create new mp3 files automatically and to ensure different sections are recorded separately: Praise Worship Intro, Praise, Worship, Call to Service, Ministration, Sermon, Alter call …
Typically, audio recording is stopped immediately after the sermon (for logistic reason). This normally provides room to commence editing recording of the day. It is practically possible to have the master copy of the day ready immediately after service if little changes have to be made (especially if ‘section’ cutting was appropriately carried out).
Editing
Audacity software (like Audition, SonarLE et al) enables direct exporting to .wav and .mp3 audio format in addition to providing workspace to edit the audio recording.
However, if using Lame HardDisk Ogg, audio editing can easily be done in mp3DirectCut can be used for slicing (large) and editing mp3 files
Mp3 Editing
Import mp3 file from Audacity to mp3DirectCut. Observe waveform. Listen. Delete (cut) section not needed.
Where desire, split mp3 recording and re-export separately.
Where desire, select section of mp3 recording and re-export separately.
Where needed, import addition mp3 file and ‘join’ together into single mp3 recording. Re-export as one mp3 file.
Skills – Audacity Editing:
– Ability to listen
– Flair for perfection
– Identification of rough or unclear section
– Computer cut, copy and paste
– Zooming: in and out or selection
– Export file or selection as mp3
It is essential to know that our final output (current objective) is an audio CD. This implies all the mp3 files selected for master copy must fit into a single audio CD which typically takes about 79mins (approx 72Mb mp3 file size).
However, for special programs such as conventions, it might be practicable to produce a single mp3 CD rather than set of 3, 5 or 7 CDs